Add Instagram Feed
Step 1:
Login to your Taggbox Account. You will land on the Dashboard. Click on the Wall Name to open the Wall Editor.
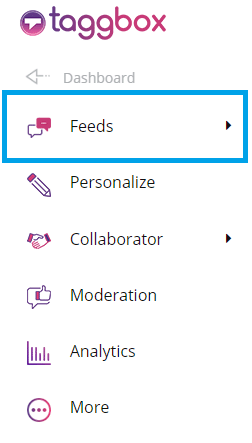
Step 2:
Click on Feeds. (You will find it on the top row in the left column)
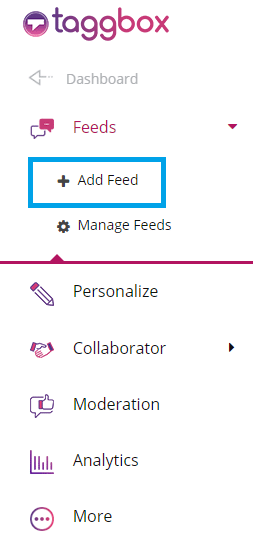
Step 3:
A drop-down menu will appear. Click on Add Feeds to create a new feed.
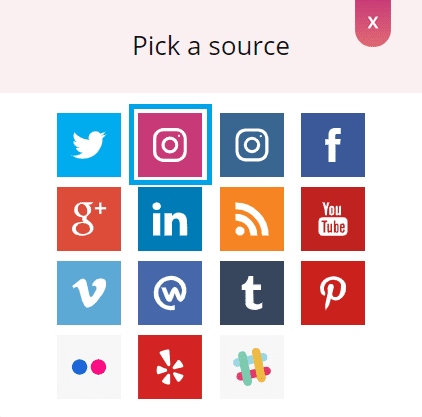
Step 4:
Select Instagram icon as your feed source from Pick a source.
Step 5:
A Create Instagram Feed box will appear. Select a source from My Profile Posts, Location, and Hashtag(#) and click on Create Feed to create an Instagram connection.
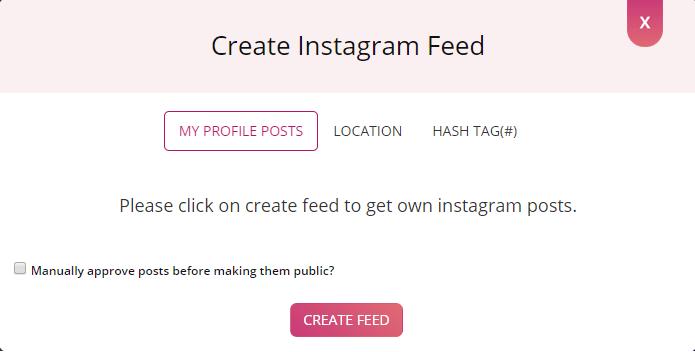
Please note that according to the updated Instagram API Policy, now you cannot fetch posts on the basis of hashtag and location through a Standard Instagram Account. To do so, you need to have an Instagram Business Account. Read more
Therefore, click on My Profile Posts and click on Create Feeds.
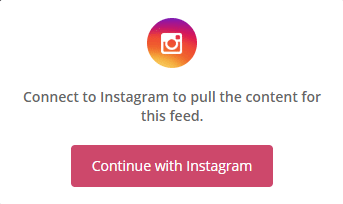
Step 6:
A Continue With Instagram box will appear. Click on it and provide your login credentials to connect your Instagram Account.
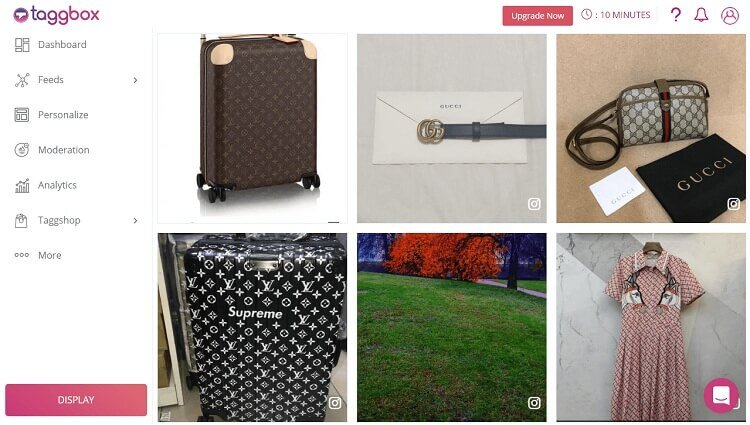
Great! You have successfully added your Instagram feeds. Soon they will appear in the wall editor. You can also use the Personalize and Moderation Panel to set up your Instagram Wall.
Make Your Instagram Feeds Shoppable
Step 1:
In your Wall Editor, open your Instagram Wall.
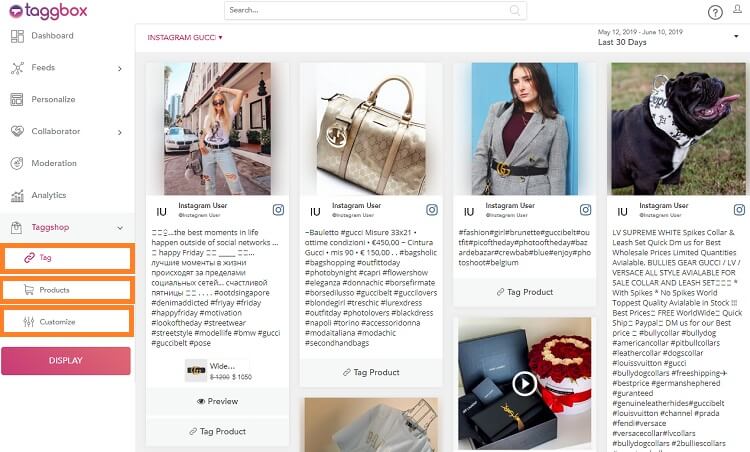
Step 2:
Click on TaggShop.

Step 3:
Three options will be available – Tag, Products, and Customize.
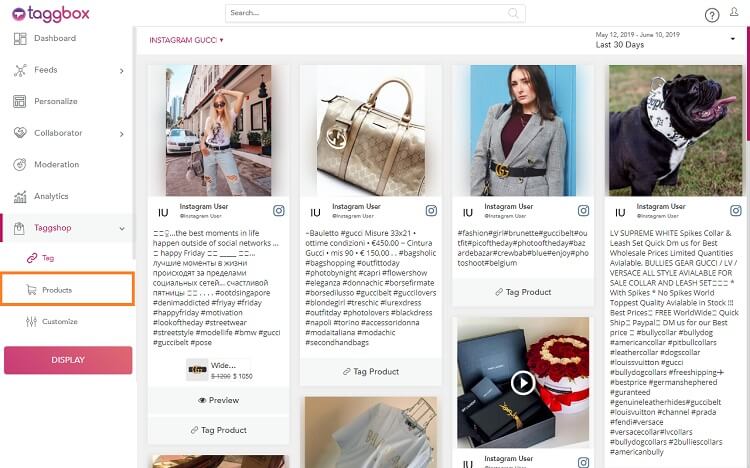
Step 4:
Click on Products and you can manually add all the products to your gallery you wish to sell.
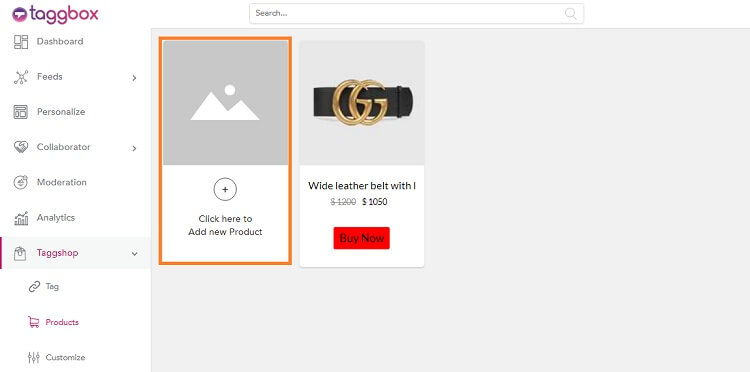
Step 5:
Click on Add New Product.
Step 6:
Enter all details about your product like Product Title, Product Price, Discount Price, and the URL which will lead your users to the webpage where they could buy that product. Don’t forget to add a beautiful image of the product.
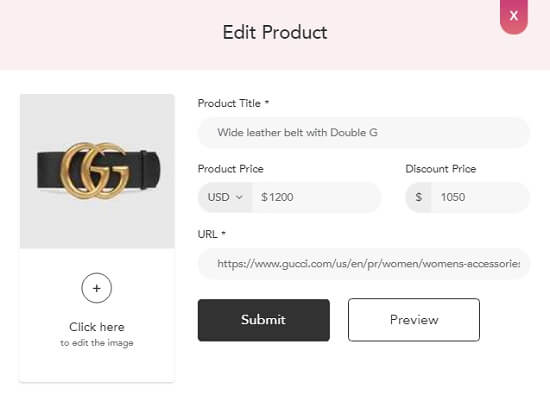
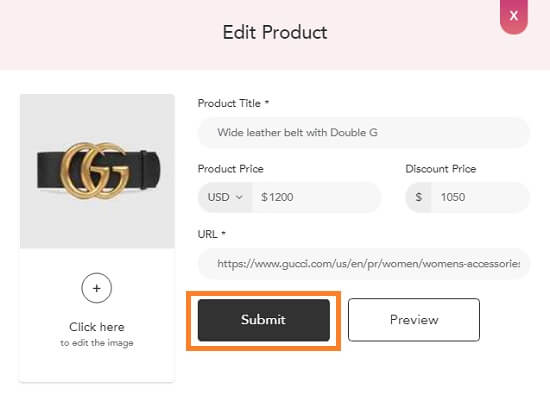
Step 7:
You can also Preview your product. Finally, click on Submit.
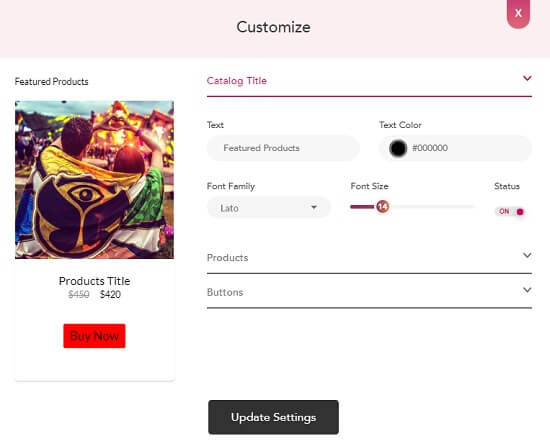
Step 8:
You can Customize your product card style and design it the way you wish.
Step 9:
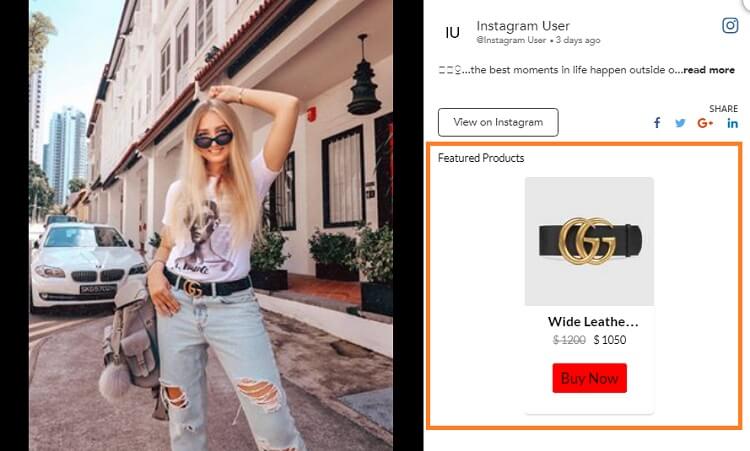
Next comes Tagging your added products with the aggregated user-generated Instagram posts. Click on Tag.
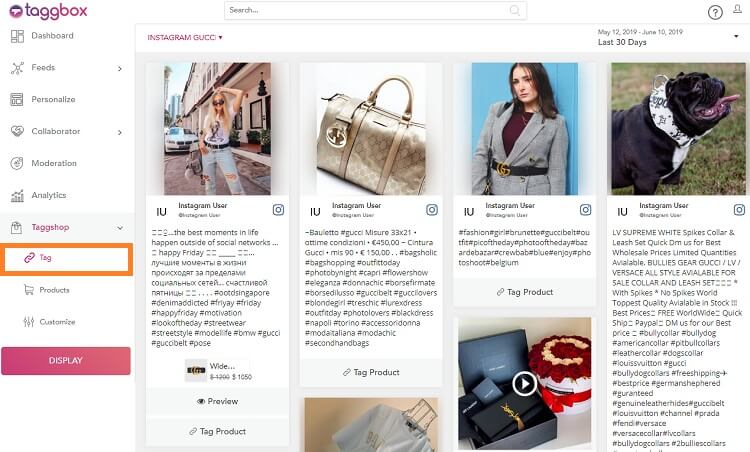
Step 10:
Now in the Wall Editor, you will see all your aggregated user-generated Instagram feeds. Each post will have a Tag Product option at the bottom.
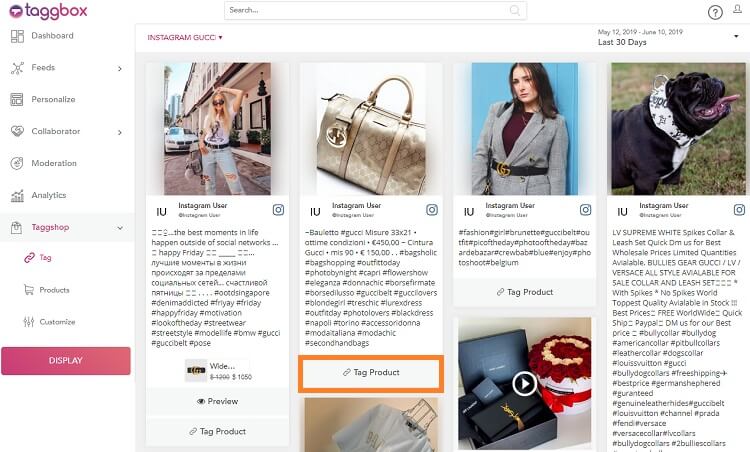
Step 11:
Click on Tag Product. From the gallery of added products, choose the ones you wish to tag with this particular post.
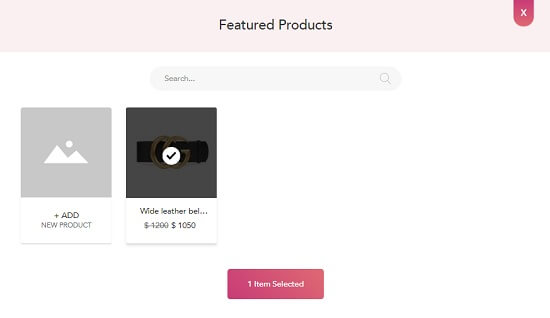
Step 12:
Do it with all the posts you wish to make Shoppable.
Great! You can successfully make your Instagram Feeds.
Embed Shoppable Instagram Feeds On Website
To embed Shoppable Instagram feeds on a website, follow these following simple steps –
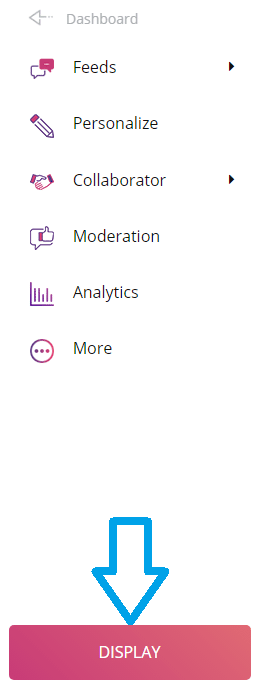
Step 1:
Click on the Display Button on your Wall Editor.
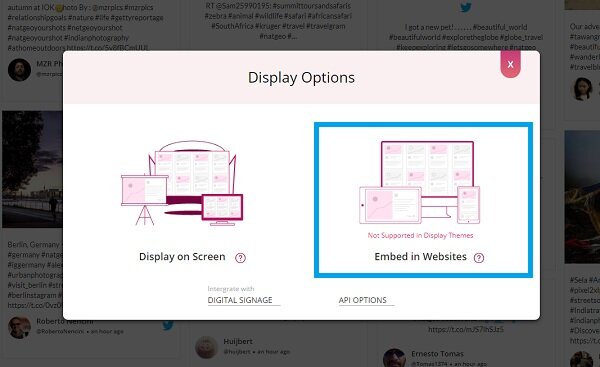
Step 2:
Select the Embed in Websites to embed your Shoppable Instagram feeds on your website.
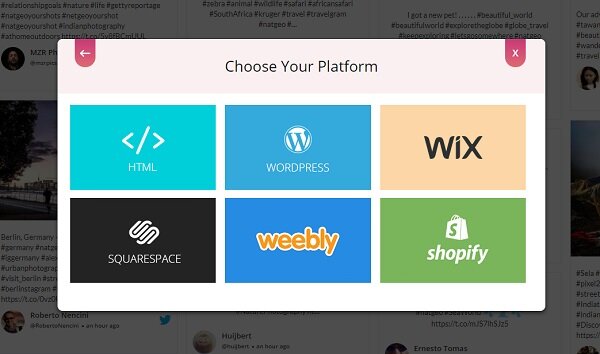
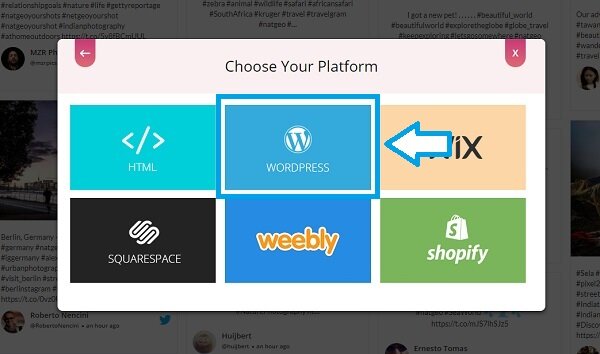
Step 3:
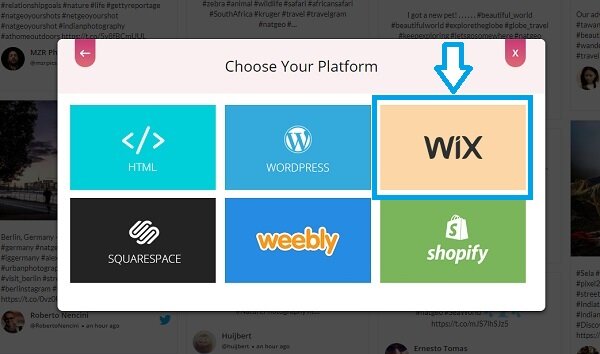
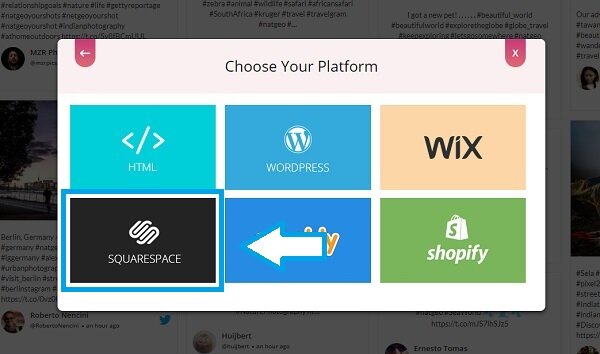
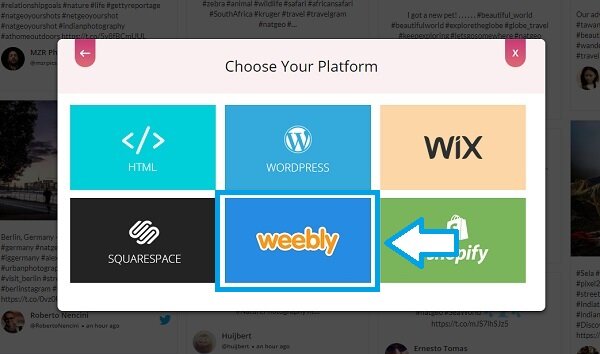
Select your Website Building Platform (E.g. – HTML, WordPress, Wix, etc.)
Embed on HTML Website
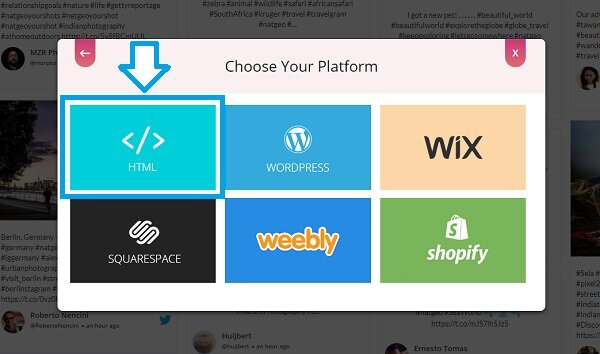
Step 1:
To embed your Shoppable Instagram feed on the HTML website, choose HTML as your website building platform.
Step 2:
Set width, height and height type as per your requirements.
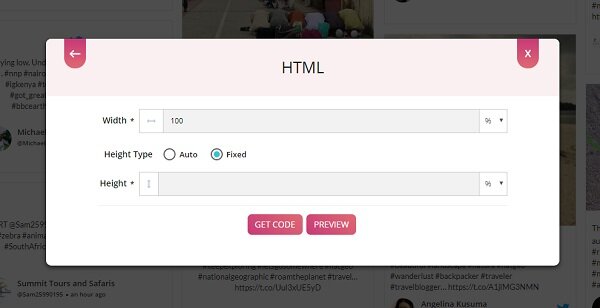
Step 3:
Click on Get Code.
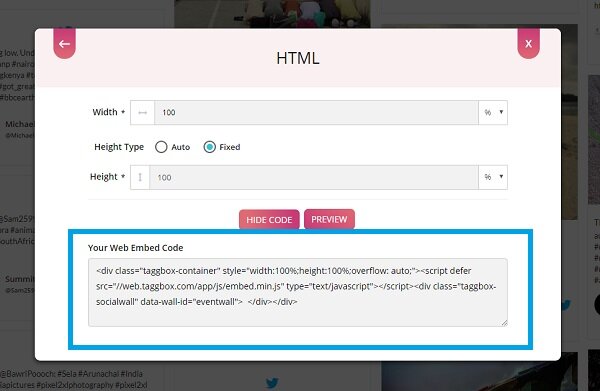
Step 4:
Copy the code from the field or you can also see a preview of your wall by clicking on Preview. Paste the code into the body section of your website.
With these steps, you can easily embed Shoppable Instagram feed on HTML website.
Embed on WordPress Website
Step 1:
To embed your Shoppable Instagram feed on the WordPress website, choose WordPress as your website building platform.
Step 2:
Set width, height and height type as per your requirements and click on Get Code.
Step 3:
Generate the Website Embed code from the Taggbox code generator and copy the Code.
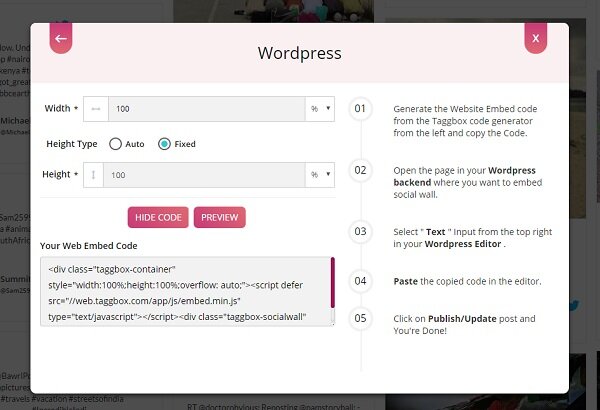
Step 4:
Open the page in your WordPress backend where you want to embed the Shoppable Instagram feeds. Select “(+)Add Block” in the top left corner of the WordPress Editor.
Step 5:
Here, click on Formatting and then choose Custom HTML. Paste the copied code in the editor. Click on Publish/Update post and you’re done.
Embed on WIX Website
Step 1:
To embed your Shoppable Instagram feed on the WIX website, choose Wix as your website building platform.
Step 2:
Open your WIX Editor, navigate to the webpage where you want to embed the Shoppable Instagram feeds. Here, click on the “+ Add” button.
Step 3:
Click on More and Select Embed a Site.
Step 4:
Check the “Website Address” under Mode.
Step 5:
Copy and paste the generated URL into the “Website Address” field.
And you’re done!
Embed on Squarespace Website
Step 1:
To embed your Shoppable Instagram feed on SQUARESPACE website, choose Squarespace as your website building platform.
Step 2:
Set width, height and height type as per your requirements and click on Get Code.

Step 3:
On Squarespace, navigate to the webpage where you want to embed the Shoppable Instagram feed.
Step 4:
Click on +Add/Edit Block and Select Code.
Step 5:
Paste the copied code and click on Apply.
Step 6:
Save the page to apply the changes.
Embed on Weebly Website
Step 1:
To embed your Shoppable Instagram feed on the Weebly website, choose Weebly as your website building platform.
Step 2:
Set width, height and height type as per your requirements and click on Get Code.
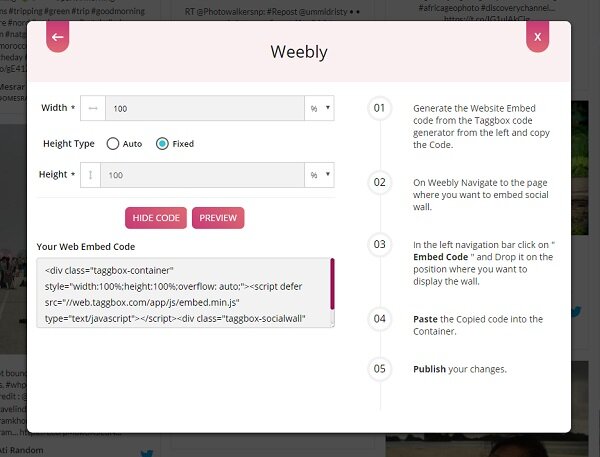
Step 3:
On Weebly, navigate to the page where you want to embed the Shoppable Instagram feeds.
Step 4:
In the left navigation bar, click on “Embed Code” and drop it on the position where you want to display the wall.
Step 5:
Paste the copied code into the Container and publish the changes you made.
Embed on Shopify Website
Step 1:
To embed your Shoppable Instagram feed on the Shopify website, choose Shopify as your website building platform.
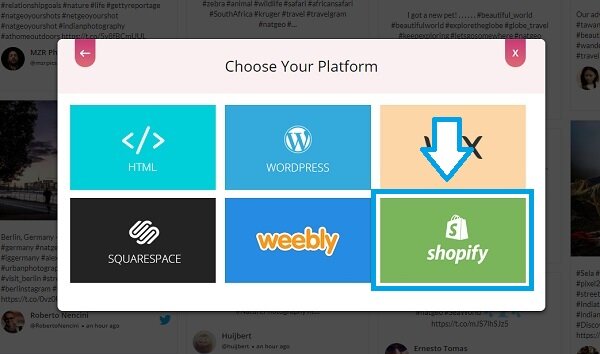
Step 2:
Set width, height and height type as per your requirements and click on Get Code.
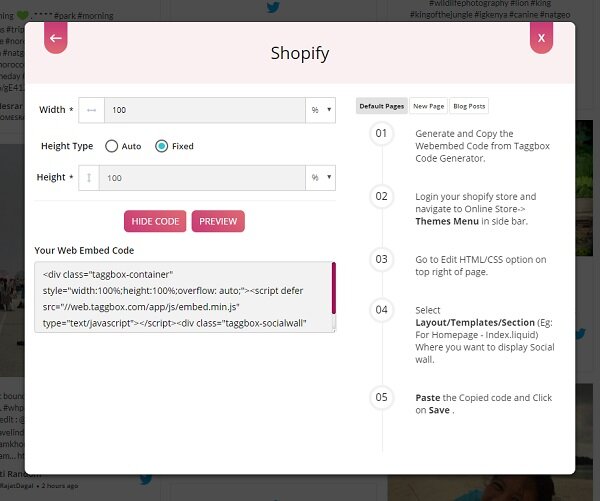
Shopify gives you the option to embed your Shoppable Instagram feed either on Default Pages or New Pages or Blog Posts.
Default Pages
Follow these steps for Default Pages:
Step 1: After generating the embed code, login to your Shopify store and navigate to Online Store -> Themes Menu in the sidebar.
Step 2: Go to Edit HTML/CSS option on top right of the page.
Step 3: Select Layout/Templates/Section (Eg: For Homepage – Index.liquid) where you want to display Instagram feeds.
Step 4: Paste the Copied code and Click on Save.
New Pages
Follow these steps for new pages:
Step 1: After generating the embed code, login to your Shopify store and navigate to Online Store -> Themes Menu in the sidebar.
Step 2: Click on Add Page on the top right corner of the page.
Step 3: Select Show HTML (<>) option of Text Editor.
Step 4: Paste the copied code and click on Save.
Blog Posts
Follow these steps for Blog Posts:
Step 1: After generating the embed code, login to your Shopify store and navigate to Online Store -> Themes Menu in the sidebar.
Step 2: Click on Add Blog post on the top right corner of the page.
Step 3: Select Show HTML (<>) option of Text Editor.
Step 4: Paste the Copied code and Click on Save.
If you have any questions or need help, please Contact us or write to us at support[at]taggbox[dot]com.