AI tools like ChatGPT, Cursor, Claude, GitHub Copilot, Windsurf or Gemini can build simple social widgets like share buttons or follow icons in one prompt. But if you want a live, auto-updating feed, you may need an ongoing API connection. Tools like the Taggbox API simplify the live-feed embed on your website by replacing multiple platform APIs with one.
Yes, you can build a social media widget with AI, be it ChatGPT, Claude, or other similar tools. These AI tools will hand you working code in minutes, and you won’t need any heavy techie skills.
But a social media widget is more than one thing; it comes in different types, and each behaves differently. Some widgets are static, so once AI writes them, you’re good to go. Others include a live feed that embeds your latest Instagram posts or TikTok posts, and those depend on an automated connection to a platform’s API, so that means you’ve got stuff to understand about how you can keep them updated in real time gradually.
In this blog, I’ve analyzed where AI works best and where you may need a platform.
If your widgets are static and won’t need syncing later, AI handles them pretty well.
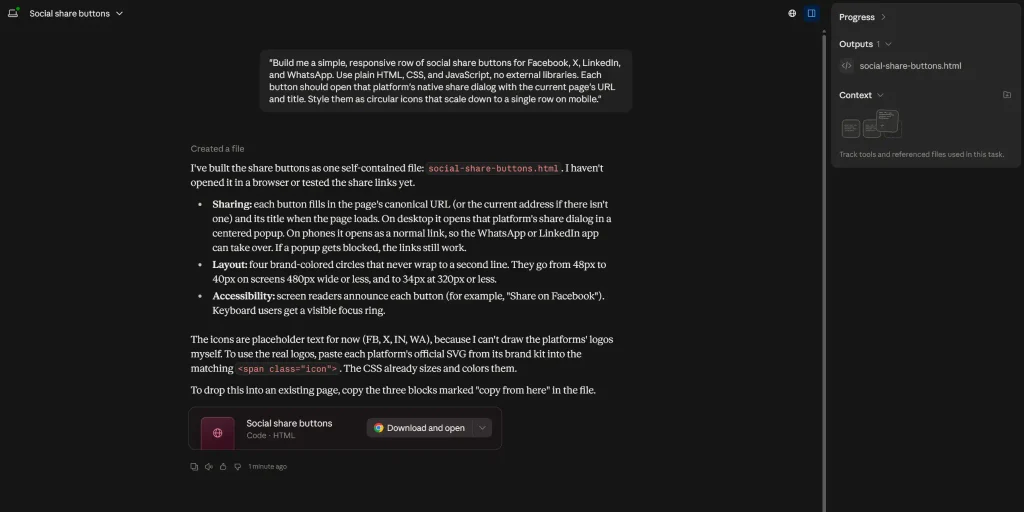
- Social Share Buttons: These icons let visitors share your page to their own social media accounts. There is no incoming data here, and the button simply opens that platform’s native share dialog.
- Follow Icons: These are links pointing to your brand’s own profiles. They’re fixed, permanent, and not connected to any API.
- Follower or Subscriber Counter: It is a simple value instead of a live count, so it’s easy to keep it current.
- “as seen on” or “featured in” logo strip: A set of logos and links you update by hand a few times a year when your list of mentions changes.
You can describe each of these to ChatGPT, Claude, or any other AI in a single clear prompt and get finished, working code back.
Prompt Example
“Build me a simple, responsive row of social share buttons for Facebook, X, LinkedIn, and WhatsApp. Use plain HTML, CSS, and JavaScript, no external libraries. Each button should open that platform’s native share dialog with the current page’s URL and title. Style them as circular icons that scale down to a single row on mobile.”
That prompt reliably gives you a ready-to-use widget in one pass because it includes everything it needs. No external data source or login is required, and nothing needs updating over time. This is the type where “AI built my widget in less than five minutes” is the right description of what happens, and it’s a good place to start.
If you’re creating a social media widget that needs to show what’s happening on a platform in the moment, it could be an Instagram feed, a YouTube video grid or basically a wall that fetches posts from several networks all at once, in one place. Though AI is involved in this, it mainly depends on a live connection to the platform behind embedding these on your website.
Two Approaches You Must Try
Note: Here we’re taking Instagram as an example.
1. Show AI a Screenshot of an Instagram Profile & Ask to Recreate Layout
AI is pretty good at reading a screenshot and producing HTML/CSS that looks identical to it. But what it will produce is a copy of a moment and not a connection to the account. So, nothing is connected directly to the platform (maybe Instagram/Facebook etc.), and hence there are no automated updates when the account posts something new.
Prompt Example
“Here’s a screenshot of my Instagram profile. Recreate this as a widget for my website. Same grid layout, same post thumbnails, same follower count and bio at the top. Make it responsive so it looks good on mobile too.”
2. Ask AI for a Basic Embed Snippet
AI can generate the code for an Instagram feed widget, but what you get depends on how the feed connects to Instagram. A static embed can display specific posts but won’t update automatically. A live feed requires Meta’s API, authentication, and a secure place to store your access token.
If you’re asking AI to build the API-based version, give it the API documentation, account details, a sample API response and your website’s tech stack. Also tell it to keep the access token server-side.
The catch: AI can write the initial code, but it doesn’t eliminate the need to maintain the API connection when Meta changes its requirements.
Prompt Example
“I want to embed a live Instagram feed on my website using the Instagram API. Here’s the relevant API documentation: [link]. Here’s a sample JSON response from a real API call: [paste response]. My account ID is [ID]. My access token is stored securely in an environment variable called ACCESS_TOKEN. Never expose the token in frontend code or send it to the browser.
My site runs on [specify tech stack]. Write the server-side code needed to fetch my latest 12 posts and display them on my website. Cache the API response for 5 minutes to avoid making a request on every page load. If the API request fails, use the most recent cached response instead.
Handle missing fields gracefully, and explain any permissions, token requirements, or additional setup needed. Also explain how I should handle token expiration or renewal.”
Get Your Gallery Access Token in Under 2 Minutes & Start Building
Start Free
With the Taggbox API, one connection replaces a separate embed for every platform. Taggbox collects posts and reviews from 25+ platforms, including Instagram, Facebook, LinkedIn, YouTube, X (Twitter) and Google. You can moderate them by hand or with automated, AI-powered filters, so you never deal with Instagram’s developer portal or Meta’s policy changes.
Getting your access token
Every request needs a token so the API knows which gallery to read:
- Log in to your Taggbox dashboard.
- Open the gallery you want posts from (or create one)
- Click the three-dot menu on that gallery’s card
- Copy the value under Access Token
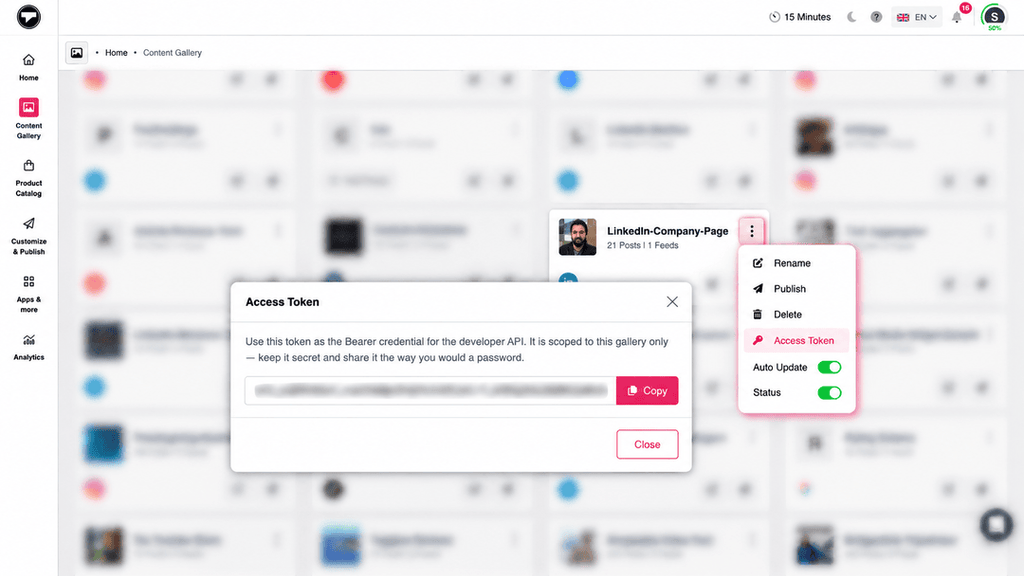
Which token to use:
| Token type | What it opens | When to use it |
|---|
| Gallery token (starts with wt1_) | One gallery only | Almost always; safe to give an agency or freelancer |
| Account key | Every gallery you own | Only when you truly need all galleries |
Account key (User API Key)

🔒
Author’s Tip
Treat both tokens like a password: keep them on your server, never in a page’s HTML or JavaScript.
Note: API access is included in the Taggbox enterprise plan. Contact the support team for more details.
You Only Need One Request for Every Network
There are no separate endpoints per platform:
GET https://api.taggbox.com/api/v3/posts?limit=24
Authorization: Bearer wt1_YOUR_ACCESS_TOKEN
What AI Gets Wrong Unless You Tell It
AI tools often copy patterns from other social-wall APIs and write code that runs but shows an empty page. Mention these 5 points in your prompt:
- Posts are inside body.posts, not at the top of the JSON.
- There is no ?fields= parameter; the full post always comes back.
- media[0] may be a video; use the first item whose type is “image” and read its cdn_url.
- Missing values are null, not “” or 0; if author.name is missing, use author.handle.
- The default sort (pinned first, then newest) is already right; don’t change it.
The steps below already handle all five, which is why the finished widget works on the first run.
How to Build a Social Wall with AI Using Taggbox API
Taggbox API works with whatever tool you are comfortable with, such as ChatGPT, Claude, Cursor, GitHub Copilot, Windsurf, or Gemini.
In four short steps, Claude turns your Taggbox widget gallery into a ready-to-run social widget for your website, with no coding required. You pick a theme, preview it, change its colours, and download a finished zip.
Our worked example uses the Modern Card theme, a card colour of #E0AA9B, and the React stack.
Requirements Before You Start:
- A Taggbox account with at least one gallery.
- A Claude chat on claude.ai (web, desktop or mobile).
- The software your stack runs on, installed on your computer or server (see the table below).
| Stack you pick | What you need installed |
|---|
| React, Node.js | Node.js 18 or newer |
| PHP, Simple HTML | PHP (any PHP host also works) |
| Laravel, WordPress, CodeIgniter, Symfony | PHP, plus your existing framework or site |
| Next.js, Nuxt, Express | Node.js, the version your framework needs |
| Vue, Angular, Svelte | Node.js 18 or newer (a small Node server keeps the token) |
| Django, Flask | Python 3 |
| Rails, Go, Java, .NET | That language’s usual runtime |
PHP, Node.js, React and Simple HTML come as a ready-made zip. For any other stack, Claude adapts the closest ready version and gives you only the 2 to 4 files your project needs, also as a zip.
The Starter Prompt
The whole build starts from one prompt. It points Claude to a ready-made instruction file on GitHub, so every user gets the same tested steps and the same finished code.
How to use it:
- Open a new chat on claude.ai.
- Copy the prompt below exactly as it is; do not shorten or reword it.
- Paste it and send. Claude shows the theme gallery (Step 1) and waits for your answer.
- Answer each question with a number or a word. Claude does one step per reply.
BASE = https://raw.githubusercontent.com/wallapi/taggbox.com-API-Docs/build - every BASE/... link, here and in the files you fetch, starts from it.
Build me a social widget from my Taggbox gallery, step by step.
Fetch this RAW and follow it exactly. It lists every step and when to stop and wait for my answer. Start with step 1 now:
https://raw.githubusercontent.com/wallapi/taggbox.com-API-Docs/build/prompts/library/build/steps.md?v=09
If you cannot open a link, say so in one line; do not build from memory.
Why it works: The instruction file already contains the theme previews, the finished code for each stack and the README, so Claude copies tested files instead of writing new code. That keeps the result the same every time and avoids the API mistakes listed above.
Tips by the author:
- Use a fresh chat, so earlier messages do not confuse the steps.
- If Claude says a link will not open, check your internet connection and send the prompt again.
- The prompt also works in other AI tools such as ChatGPT, Gemini, Cursor or Claude Code; the instruction file has separate steps for them.
Steps:
Step 1: Pick a theme
Claude shows a gallery of 17 widget themes right in the chat. Reply with a theme’s number or name; if you reply “skip”, you get 3. Modern Card.
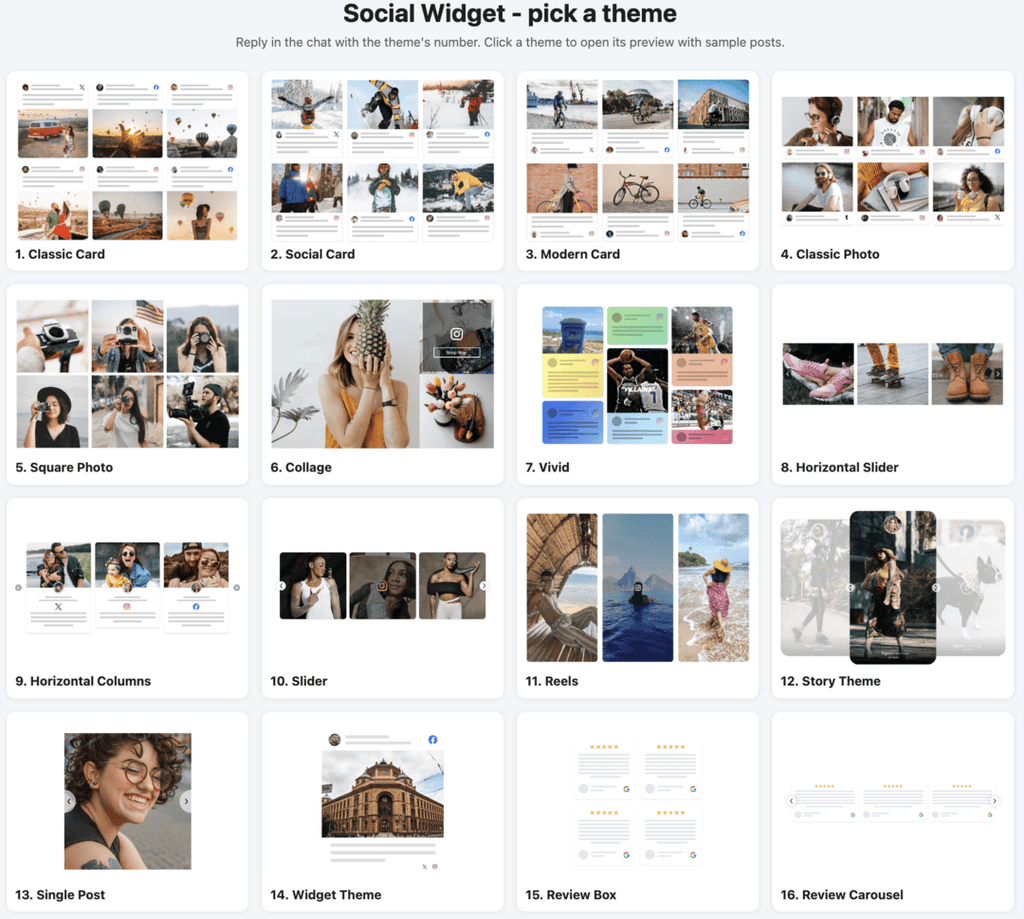
In our example, we replied 3.
Step 2: Preview your theme
Claude opens a live preview of the chosen theme, filled with sample posts. Images look blurred inside the chat preview; save preview.html and double-click it to see them sharp.
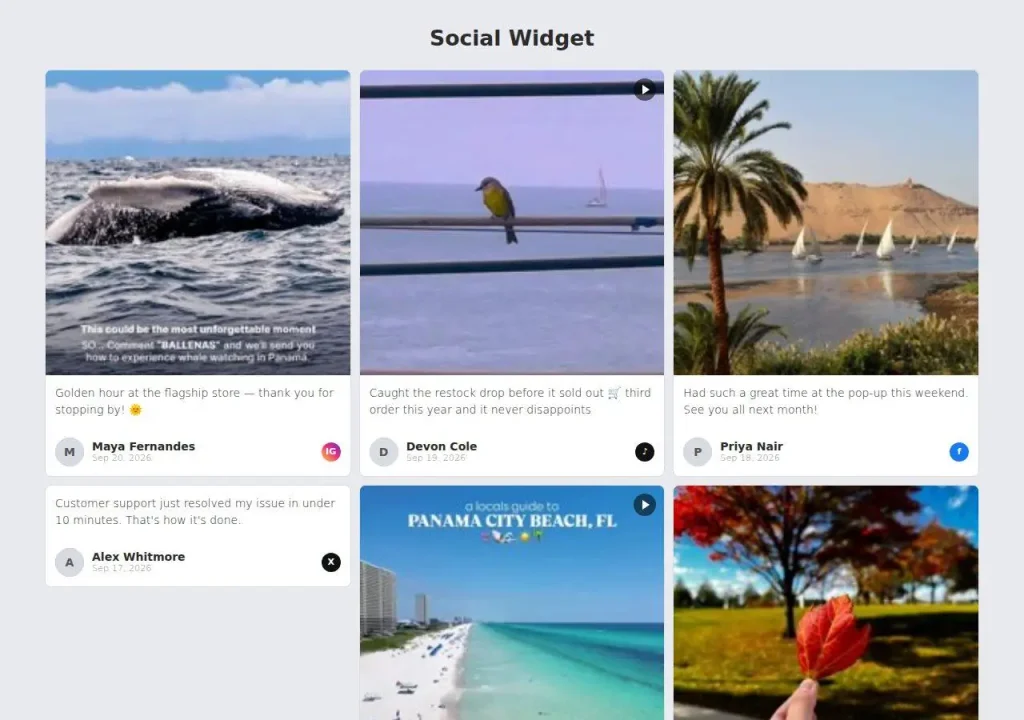
Claude then asks two questions:
- Want to change anything? (colours, font, columns, corners, spacing) Or say “no”.
- Which stack should it be built in? PHP, Node.js, React, Simple HTML, or Other (Laravel, WordPress, Next.js, Vue, Django, Flask and so on).
Step 3: Change the look (optional)
Describe the change in plain words, and Claude writes a small custom.css file, then shows the preview again with your change. We asked for a card colour of #E0AA9B, and only this line changed:
:root {
  --tbx-surface: #E0AA9B;
}
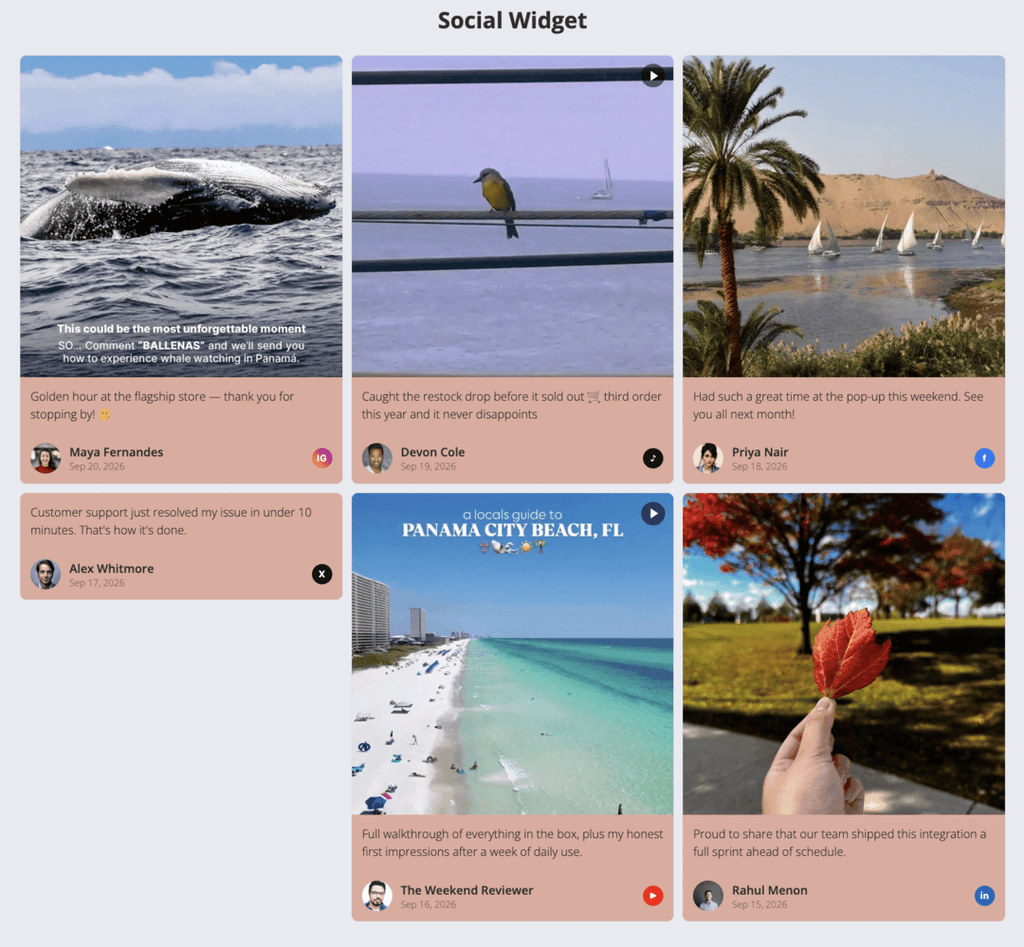
You can repeat this step as often as you like. Things you can ask to change:
| What to change | Setting |
|---|
| Page background | –tbx-bg |
| Card color | –tbx-surface |
| Post text color | –tbx-text |
| Author name color | –tbx-author |
| Font, weight, text size | –tbx-font, –tbx-weight, –tbx-size |
| Card and image corners | –tbx-radius, –tbx-img-radius |
| Space between and inside cards | –tbx-gap, –tbx-pad |
| Number of columns | –tbx-cols |
| Text lines shown | –tbx-lines |
Step 4: Choose a stack & download
Reply with your stack, and Claude hands you a finished zip; it doesn’t write code from scratch. We replied React and got social-widget-react.zip, which contains:
| File | What it does |
|---|
| server.js | Holds the access token, calls the Taggbox API and caches posts |
| src/SocialWidget.jsx | Draws the widget in the chosen theme |
| src/main.jsx, index.html | Start the React page |
| vite.config.js | Sends the page’s /api calls to the server |
| package.json | Lists the packages and start commands |
| themes/modern-card.css, .json | The theme’s look and settings |
| custom.css | Your Step 3 changes |
| samples/social.json | Sample posts, shown until you add a token |
| .env | Settings: WIDGET_THEME=modern-card, ACCESS_TOKEN empty |
| README.md | Full instructions for beginners |
Run it and add your token:
- Unzip the file and keep the folders as they are.
- In that folder, run npm install, then npm run dev.
- Open http://localhost:5173. You will see the sample posts.
- Get your token: Taggbox dashboard, your gallery’s card, three-dot menu, “Access Token”.
- Paste it after ACCESS_TOKEN= in the .env file and restart. Your real posts now appear.
npm run dev starts both parts at once: the token-holding server on port 3001 and the page on port 5173. The server caches posts for 5 minutes, so a newly approved post can take up to 5 minutes to appear.
Other stacks start differently: PHP and Simple HTML use php -S localhost:8080; Node.js uses npm install then npm start.
Keep the access token only on the server, in .env or your host’s settings. Never put it in frontend code, a public folder, or git; add .env to .gitignore.
Save the API rules once, in a project instruction file
Instead of pasting long API instructions into every prompt, save them once in your AI tool’s project instruction file. The tool reads it on every request.
| AI tool | Instruction file |
|---|
| Claude Code | CLAUDE.md |
| Codex | AGENTS.md |
| Cursor | .cursor/rules/ |
Put the five rules from “What AI gets wrong unless you tell it” in that file. After that, short prompts such as “add a network filter” or “add a Load more button” are enough.
My Analysis: When Do You Only Need AI & When You Need an API Along
AI can write the code for a static widget on its own, but a live social feed needs an API connection. Connecting each network directly means managing all of this, once per network:
| You manage per network | Example of what goes wrong |
|---|
| A separate API | Different endpoints and data formats |
| A separate token | Each one expires or is revoked on its own schedule |
| Authentication | App reviews and developer-portal approval |
| Rate limits | The feed stops when a limit is hit |
| Policy changes | A platform update breaks the widget overnight |
With Taggbox you manage one API, one token and one response format for every network.
What More Do You Get with Taggbox Other Than The API?
I feel the API is one way into Taggbox, not the only way. The platform underneath it is what’s doing the collecting, moderating, and organizing before a single post ever reaches that GET request. And all of that is available on its own through a dashboard for anyone who’d rather not touch code at all.
And that means someone on a marketing team can go into the dashboard, connect their accounts, set moderation rules, choose a layout, and publish a feed without writing a line of code themselves, with the depth of that toolkit scoped to whatever plan they’re on.