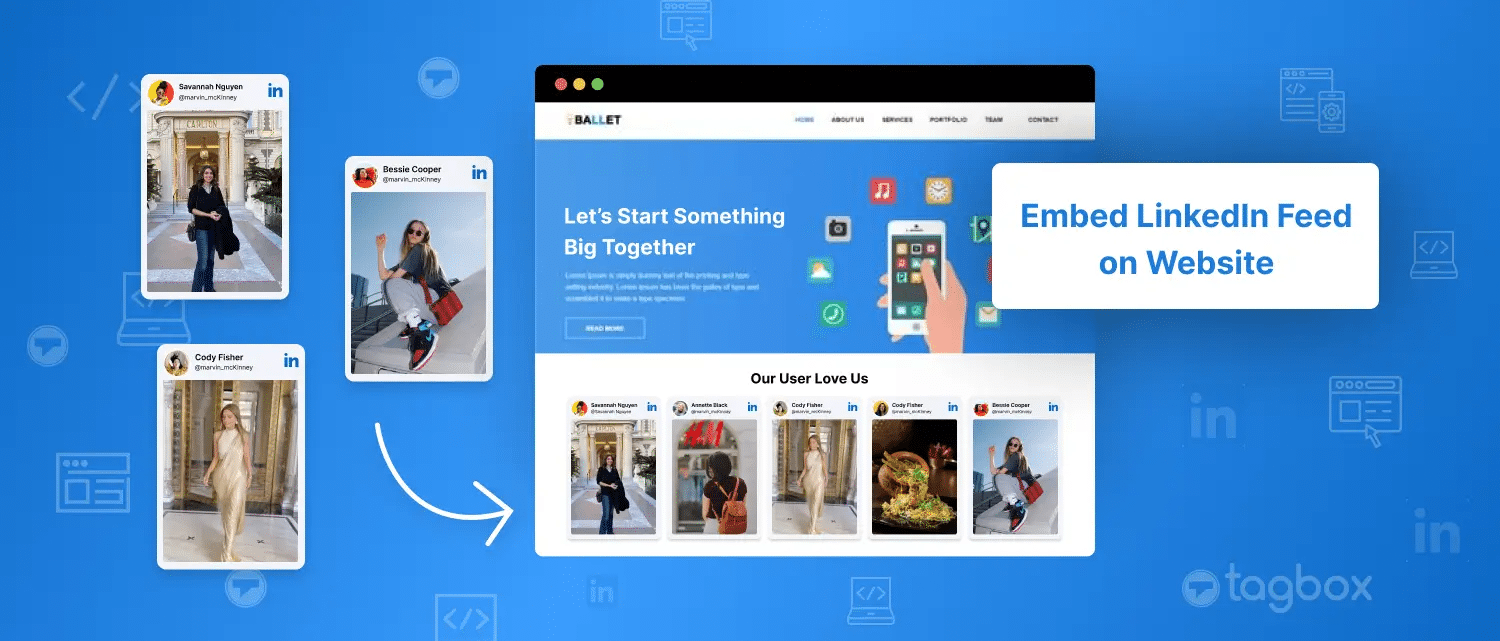
How To Embed LinkedIn Feed On Website in 2025 [With Official APIs]
As a B2B Brand, if you keep your LinkedIn account away from your website, you must catch up on a lot for your business. After all, your prospects can choose to interact with your brand through any channel. In such a scenario, LinkedIn can be the best representative of your brand. Opting to embed LinkedIn feed on website is not just a trend but the need of the hour.
When businesses embed LinkedIn company feeds on their website, they provide visitors with more content using the LinkedIn Official APIs. More importantly, it offers them a glimpse into what they can expect from the brand and gives them an icebreaker with which to interact.
If you are wondering how to embed a LinkedIn profile feed on the website, we are here to help. In this blog, we will unveil all the possible ways to show LinkedIn posts on the website.
What is LinkedIn Feed?
“A LinkedIn feed contains updates such as posts, videos, comments, and reactions from your network. It can easily appear on your website using a LinkedIn aggregator tool.”
A LinkedIn post is a hub for professional networking, industry insights, job opportunities, and thought leadership. Users can engage with the feed on the LinkedIn website by scrolling through the content, clicking on the CTA button, etc.
With Official APIs | No Credit Card Required
What Does Embedding LinkedIn Video Feed On A Website Mean?
Embedding a LinkedIn feed on the website means bringing all the LinkedIn content onto your web page. This LinkedIn can include updates, posts, videos, and other activities from a company page. Businesses need to showcase their online presence, and embedding LinkedIn posts on websites can help them achieve this. It allows the brand to share industry updates and engage with website visitors.
By integrating LinkedIn feeds, businesses can demonstrate their industry expertise, encourage visitors to connect, and promote job openings and company culture.
Understanding how to embed LinkedIn profile feed on websites enables businesses to leverage the power of social proof and strengthen their online branding. This ultimately enriches the user experience, drives engagement, and fosters meaningful connections.
Quick Guide: 5-Step Process To Embed LinkedIn Feed On Your Website (For Free)
- Create a Tagbox Widget Account.
- Select “LinkedIn” as a source in the Add Feed Section.
- Select the filter using which you want to fetch content. You can choose from Handle, Hashtag, Post URLs, etc.
- Choose the theme from the list & click on the Publish button, and copy the LinkedIn feeds embed code.
- Now, go to your website & paste the embed code for LinkedIn Posts. Voila! You are done.
Ultimate Guide: Free LinkedIn Feed Embed With Auto-Update On Your Website
With auto-update functionality, your feed will automatically refresh with new content, ensuring visitors always have access to the latest information. Here are the steps you must follow to embed LinkedIn feed on website for completely free:
1. Create an account on Tagbox or log in to your existing account.

2. Choose Display “social feeds on website” from the three given options.

3. Select your industry type to get the personalized feeds. Verify your email address if you haven’t logged in with your Google account.

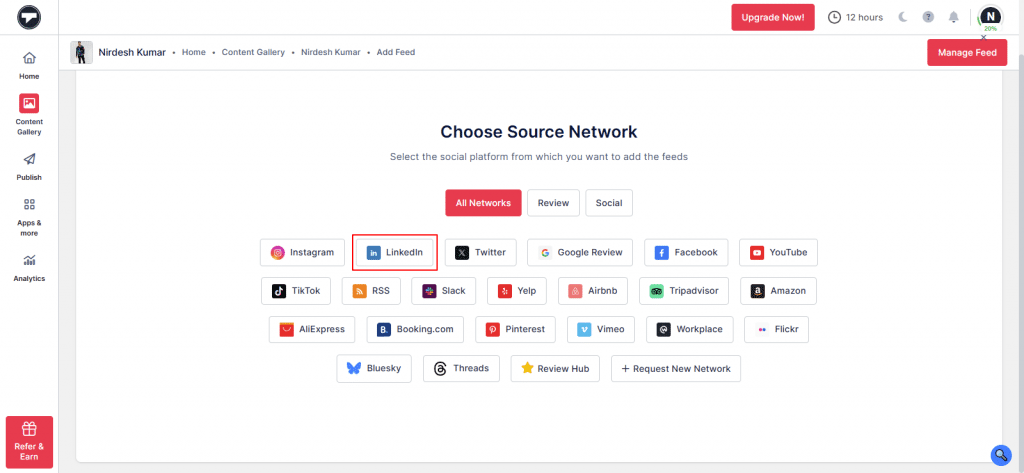
4. Pick LinkedIn as your content source.
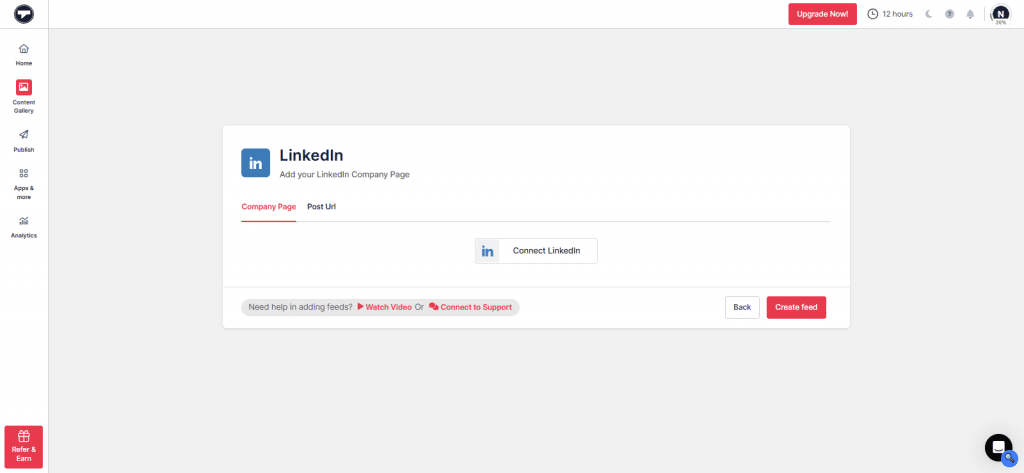
5. Choose how you want to pull content – Company page or post URL & Connect your LinkedIn account.
6. Your feed is now created, and you can moderate the content you want to make public.
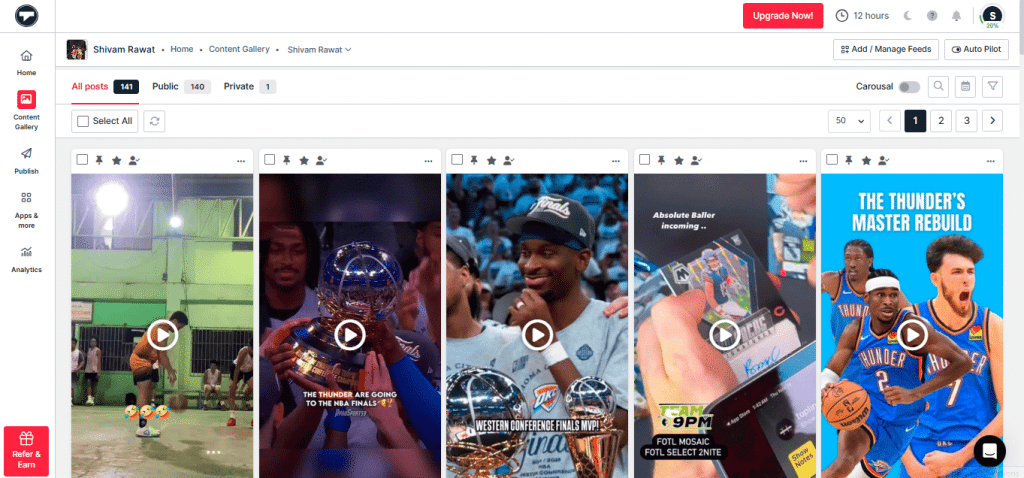
7. Go to the “Publish” section and edit your feed – Select theme, customize the feed, or even add a call-to-action button.
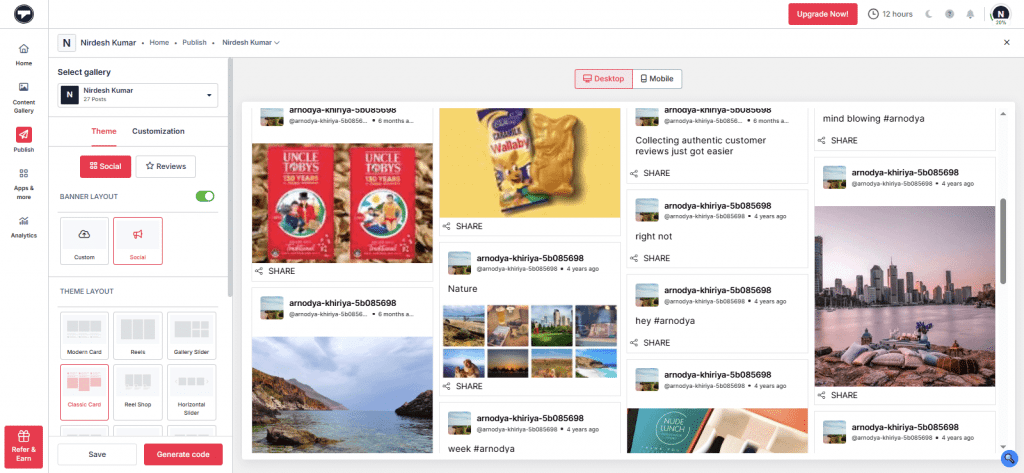
8. Once everything’s set, hit “Generate Code”. Select the platform on which your website is built, enter the width and height of the gallery, and copy the code.
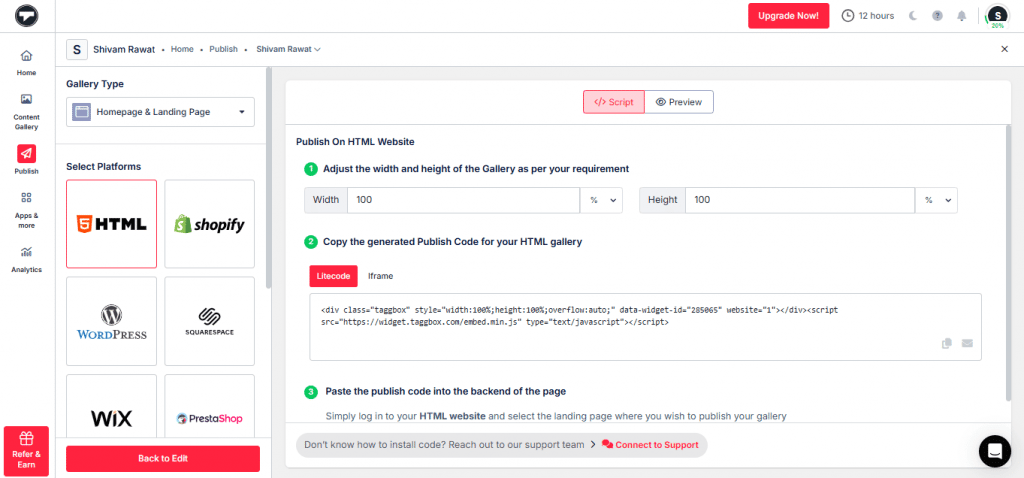
9. Go to your website’s backend. Visit the page where you want to place the gallery. Now Paste in the code and save changes.
10. Enjoy your LinkedIn feed on your website.
Practical Guide: Insert LinkedIn Feed into Website Builders
To embed LinkedIn profile feed on different CMS building platforms, select the platform and follow the steps below:
1. To WordPress Website
WordPress is a simple, powerful, and popular open-source website creation tool. Almost 32% of all websites on the Internet are powered by WordPress.

- Select WordPress as your website platform.
- Generate an embed code from the Tagbox widget editor.
- Open the page in your WordPress editor where you want to embed LinkedIn feed on the WordPress website
- Select “Text” Input from the top right in your WordPress Editor.
- Paste the Tagbox embedding code in the editor. Then click on Publish/Update post, and you’re done.
And now refresh your website and check your WordPress LinkedIn widget.
2. To Shopify Website
Shopify is an effective e-commerce website builder that allows merchants to design, develop, market, and sell goods to consumers worldwide. Shopify integrates more than 70 payment gateways with checkouts in more than 50 languages, making selling products to customers worldwide easy.

- Select Shopify as your website-building platform.
- Create the website embed code from Tagbox
- Log in to your Shopify store
- Navigate to the Online Store in the Sales Channel
- In the drop-down menu, select the Themes option
- Go to the Edit HTML/CSS option on the top right of the page
- Select Layout/Templates/Section where you want to display the LinkedIn feeds
- Paste the copied code and click on save.
3. To Elementor Website
To embed a LinkedIn profile feed on the Elementor website, follow these steps to integrate it easily.

- In the widget editor, click on the ‘Embed Widget’ button.
- For Elementor, choose ‘WordPress’ as your platform and click on the Copy Code of the Elementor linkedin widget.
- Log in to your Elementor website and navigate to the page or post where you want to embed your LinkedIn post on the Elementor website.
- In the Elementor editor, find the HTML widget or drag or drop a new one onto the page.
- Paste the copied embed code into the HTML widget.
- Save your changes in the Elementor editor.
Reload your site and check your Live LinkedIn feed.
4. To HTML Website
You must first generate an embed code from the Tagbox widget editor to embed a LinkedIn feed on your HTML website.

- Click on the “Publish” button of your widget editor.
- Select the “Embed On Webpage” option to show the LinkedIn video on the Website.
- Select HTML as your website platform.
- Set width and height of your linkedin HTML widget as per your requirements.
- Now click on Get Code.
- Copy the generated code and paste it into the backend of your webpage, where you want to embed the LinkedIn company feed. If you are not very technical, ask your developer to do that.
- With these steps, you can easily embed LinkedIn feed on HTML website.
5. To Squarespace Website
Squarespace is a SaaS-based web development and publishing platform that provides its users with beautifully designed templates, integration of third-party apps, CSS access, customization, etc.

- Select Squarespace as your website platform and generate the embed code
- Navigate to the page where you want to LinkedIn feed embed on your website
- Click on +Add/Edit Block
- Select Embed from the menu and click the </> icon in the URL field
- Paste the Tagbox embed code
- Click on Apply to save the changes made on the page
6. To Wix Website
Wix is a cloud-based web development platform serving over 110 million users in 190 countries. It allows its users to create HTML5 websites and mobile sites using online and drag-and-drop tools.

- Select Wix as your website platform and generate an embed code from the Tagbox widget editor.
- Navigate to the page where you want to display LinkedIn posts on the website.
- You will see a “+ Add” button in the menu bar on the left side of the screen. Clicking on it will enable you to add more elements to your web pages.
- Click on More and select HTML iframe from the Embeds.
- Now enter the HTML code of Tagbox in the code field,
- Click Apply to save the changes, and it’s done.
- You have successfully integrated LinkedIn posts on your website.
7. To Weebly Website
Weebly is a website-building and e-commerce service that powers millions of businesses on more than 50 million sites worldwide. Its users enjoy unique features like simple navigation and user-friendly platforms.

- Choose Weebly as your website-building platform
- Generate the embed code from Tagbox
- Go to the page where you want to show LinkedIn feed on the website
- In the left navigation bar, click on “Embed Code.”
- Drop it in the position where you want to display the feeds.
- Now, click on the HTML box and choose the Edit Custom HTML option
- Paste the copied code in the box
- Publish your changes
8.) To Webflow Website
Follow these straightforward steps to show LinkedIn posts on your Webflow website easily.

- Once you have generated the embed code, choose Webflow as your preferred CMS platform.
- Copy the Embed Code.
- Now, log in to the admin panel of your Webflow website account. Navigate to the page where you want to embed your LinkedIn post.
- Click the ‘Add Element’ button from the menu panel and scroll down to see the ‘Embed ’ option.
- Drag and drop the embed element to your webpage and the LinkedIn posts.
- Paste the embed code and save the changes so you can see your LinkedIn post on the Elementor website.
9.) To SharePoint Website
SharePoint is a Microsoft-powered platform for managing internal communications. It also allows content management, which is why brands use it to create small web pages.

- From the various CMS platforms given, choose “OTHER”
- Adjust the LinkedIn widget’s height and width and copy the embedded code.
- Log in to your Microsoft SharePoint account and navigate to the admin center.
- Choose the active sites option and go to the webpage where you want to show your LinkedIn content.
- View all site settings and click on the HTML field security.
- Check the last option; in the text field, write “Taggbox.com.”
- Now click on “Edit” and choose the “Embed” option.
- Paste the embed code and reload. You’ll now see your LinkedIn feed on the website.
10.) To Blogger Website
Blogger is a popular blogging platform powered by Google. Its easy and innovative interface allows beginners to navigate and start their blogs easily. Here’s how you can embed LinkedIn feed on a Blogger page

- Select “OTHER” from the options of different CMS platforms.
- Adjust the dimensions of your LinkedIn widget to the location where you want to embed it.
- Once you’re satisfied with the widget’s height and width, click the “Copy” button.
- Sign in to your Blogger admin account and choose the blog where you want to display the LinkedIn feed.
- Open the backend of the blog and paste the embed code.
- Save the changes and reload.
Take Control: Advanced Options To Customize LinkedIn Posts
Here are some of the best features offered by our LinkedIn widget to effortlessly embed a LinkedIn feed on a website. Customize your LinkedIn feeds with our Tagbox LinkedIn widget features. The following are the features you can personalize in the content collected from LinkedIn to make it more attractive on your website.
- Themes/layout: Choose the best-fit theme & layout for your LinkedIn Feed Widget.
- Background: Create a background for your widget according to your website’s guidelines to visually align the widget with the brand theme.
- Banners: Add a Banner above your feed widget to promote your campaign & make it engaging.
- Card Style: Make the LinkedIn feed look even better with different options to showcase the posts.
- Theme Settings: Customize the theme selected to make the widget look attractive.
- Custom CSS: Use CSS code to design the feed as you will.
- CTA: Integrate a Call-to-action (CTA) button so that the user can take action.
You can also visit the More tab to find some more useful features, such as:
- Custom Posts: A user can upload any posts into the widget.
- Profanity Filter: This feature allows users to filter explicit content before collecting it.
- Advanced Moderation & Filter: Make the LinkedIn posts public or private based on the relevance of the content collected.
- Custom Language: Choose the language in which you want to display the collected content.
Official Guide: Alternative Way To Embed LinkedIn Feed On Your Website
You can also use LinkedIn to embed feeds. Follow the steps below to do the same.
- Login to your LinkedIn account.
- Go to the post you want to embed.
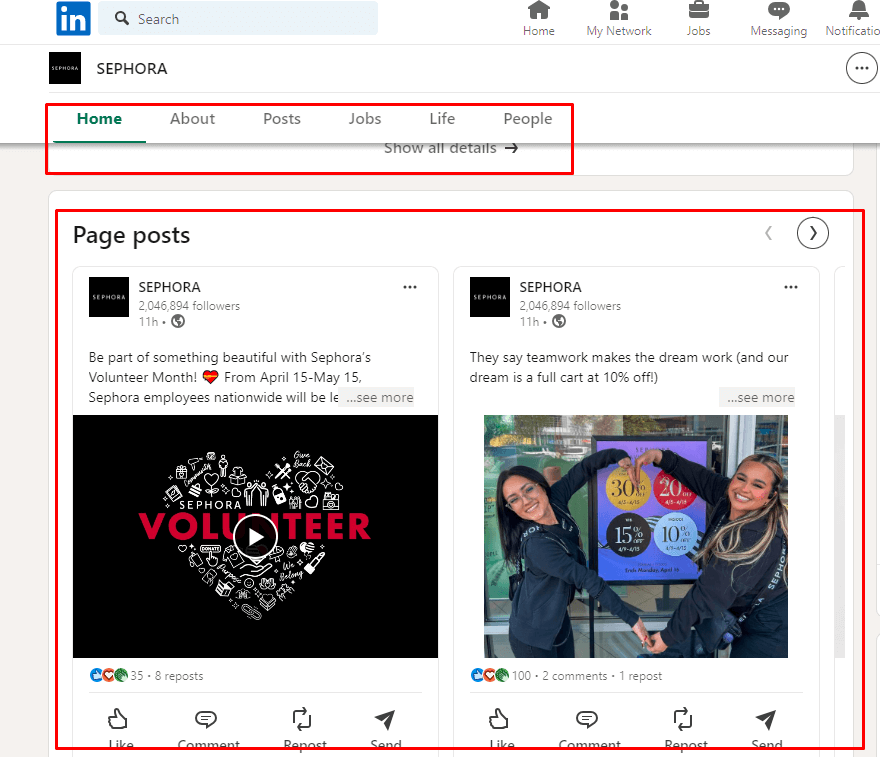
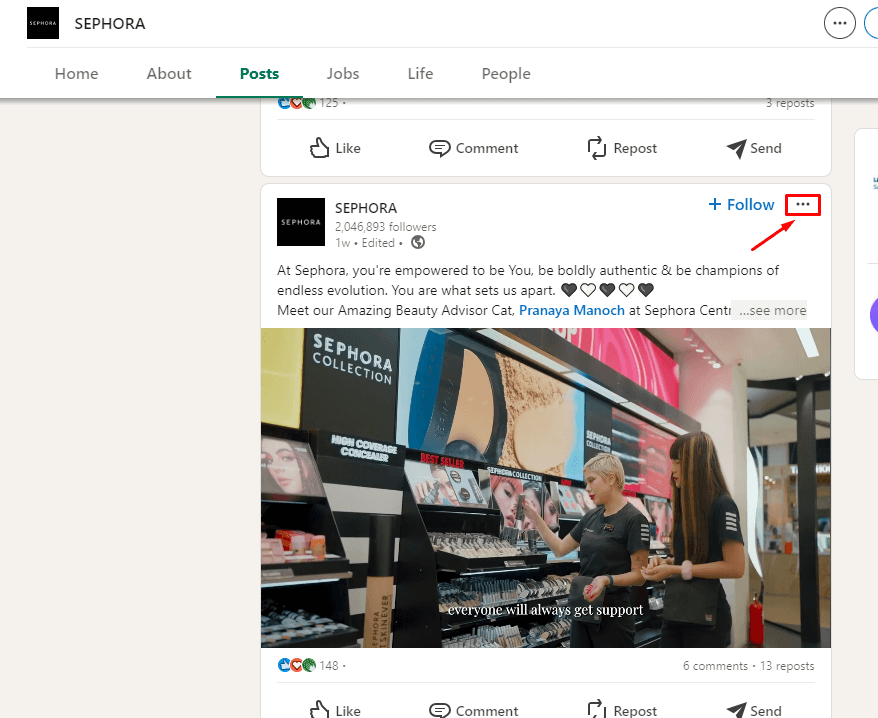
- Click the three dots (…) icon from the post’s top right corner.
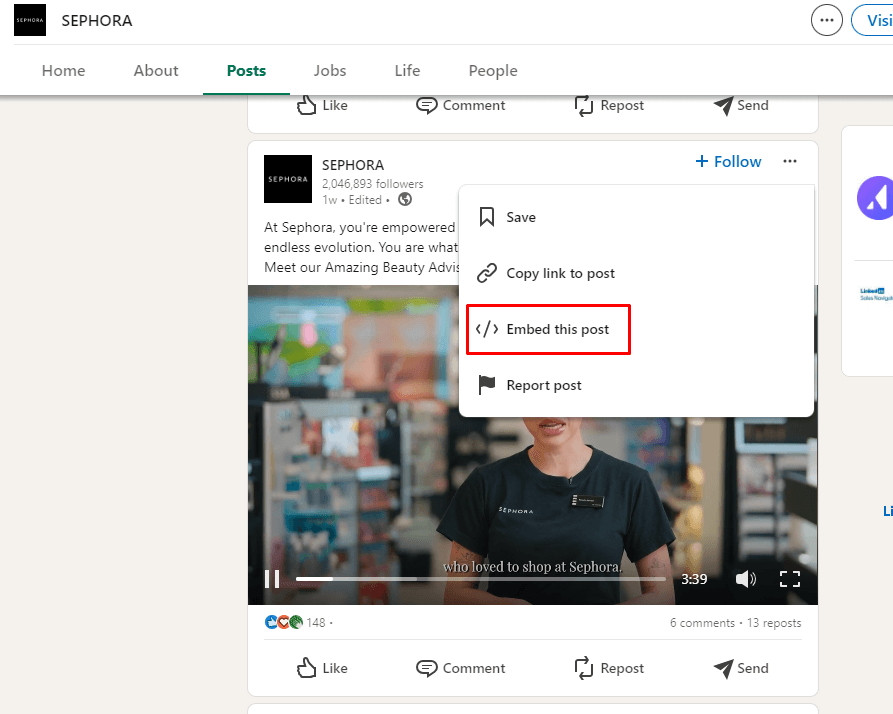
- Click on “Embed this post”.
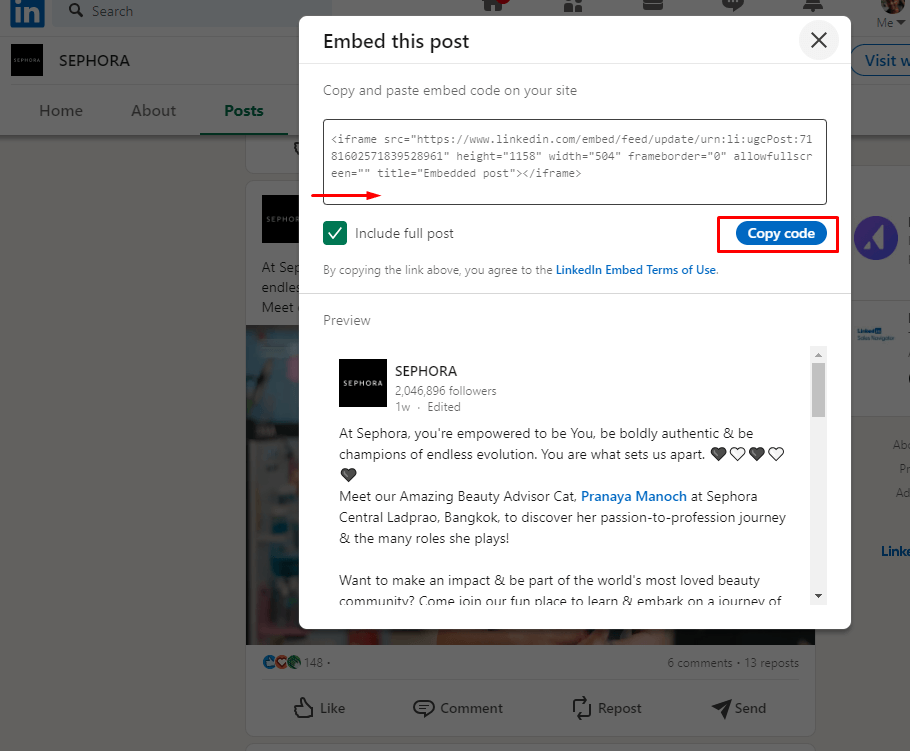
- Copy the LinkedIn embed code that appears in the pop-up window.
- Paste the code where you want to display the LinkedIn post on a website.
Examples of embedded LinkedIn Feed On Website
Here are some authenticated LinkedIn post examples to show off your business on your website.
1. Infosys Finacle
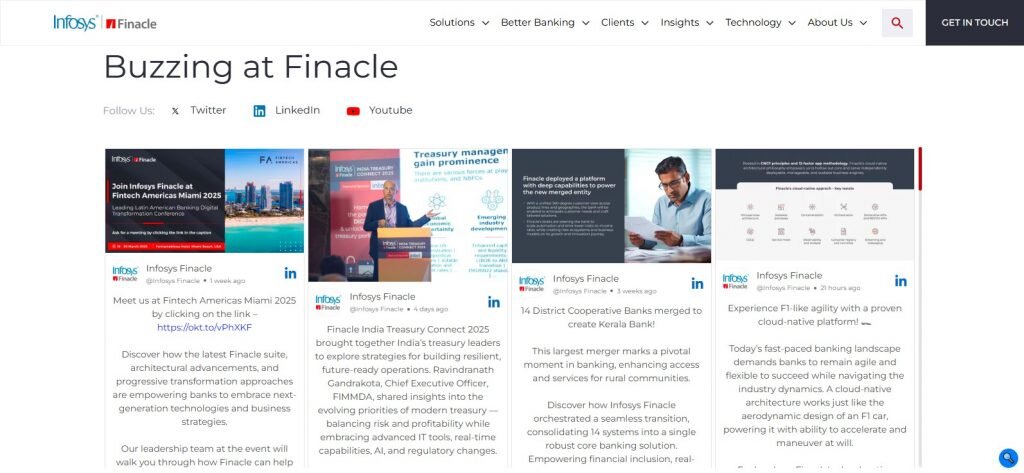
Finacle is a SaaS-based platform that deals with banks and provides them with core banking services and solutions. On the bottom of its homepage, Finacle has LinkedIn embed company feed. The feed contains Tweets from its official LinkedIn account, allowing website visitors to view the latest posts.
Best Feature: A notable feature of the LinkedIn feed embedded by Finacle is that the reader can read the whole LinkedIn post without leaving the page, no matter how long it is. This encourages visitors to stay on the website longer.
2. TVP Solar
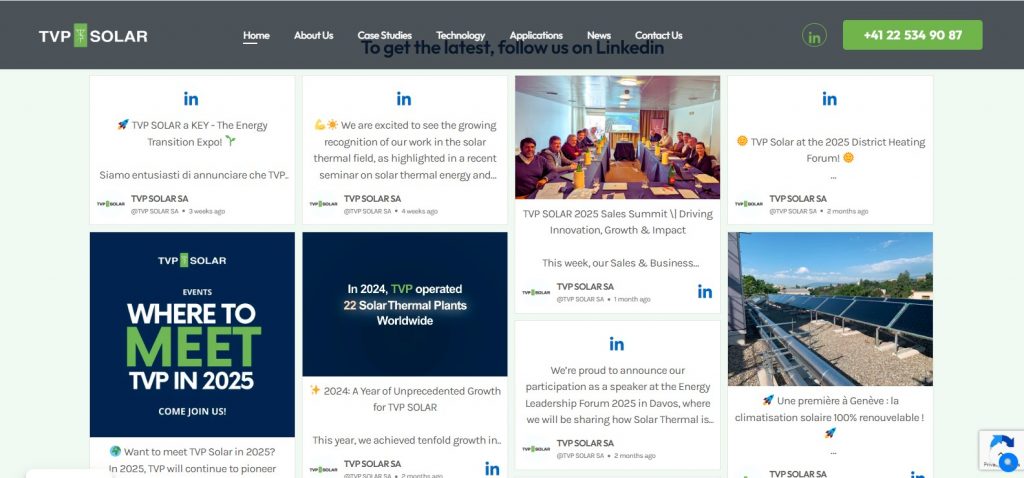
TVP Solar is a renowned brand that distributes solar panels in different countries around the globe, fulfilling its aim to reduce carbon emissions. To encourage website visitors to connect with it, TVP has embedded a LinkedIn feed on its homepage.
Best Feature: TVP allows website visitors to share their viral LinkedIn posts on social media platforms like Twitter and Facebook.
3. Bio Fabrication 2025
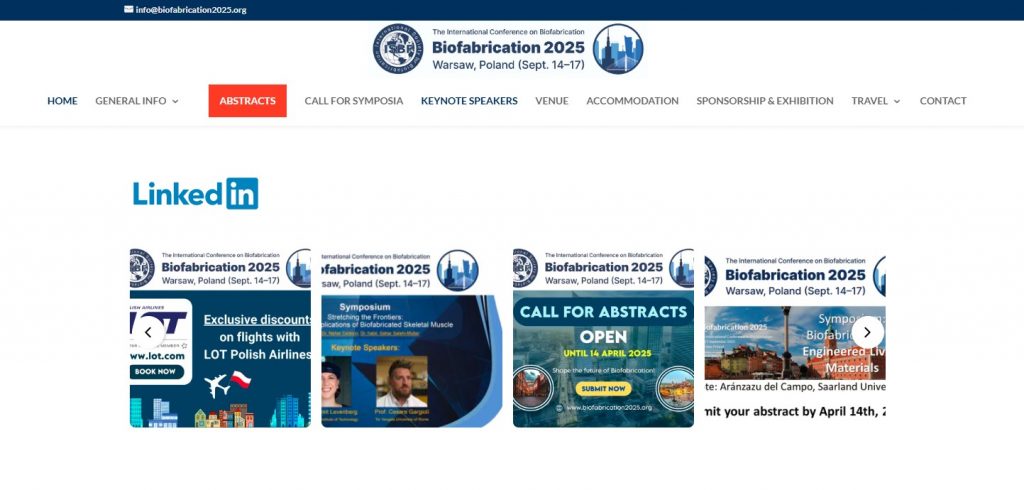
Bio Fabrication is an annual conference that focuses on biofabrication and
how it has changed over time. It is a large-scale conference; hence, to keep the people updated about their actions, they’ve embedded their LinkedIn Feed on their website.
Best Feature: The LinkedIn widget added to the website showcases only the image, keeping the focus on the important information.
4. CYEQT

CYEQT is a German platform that provides knowledge material related to cybersecurity, including video courses and learning materials. Its website has embedded a LinkedIn feed that showcases posts about the importance of and latest developments in the Cybersecurity industry.
Best Feature: Anyone interested in Cybersecurity can learn from industry experts and their views on the subject, enhancing the visitors’ experience.
5. International Cargo Express (ICE)
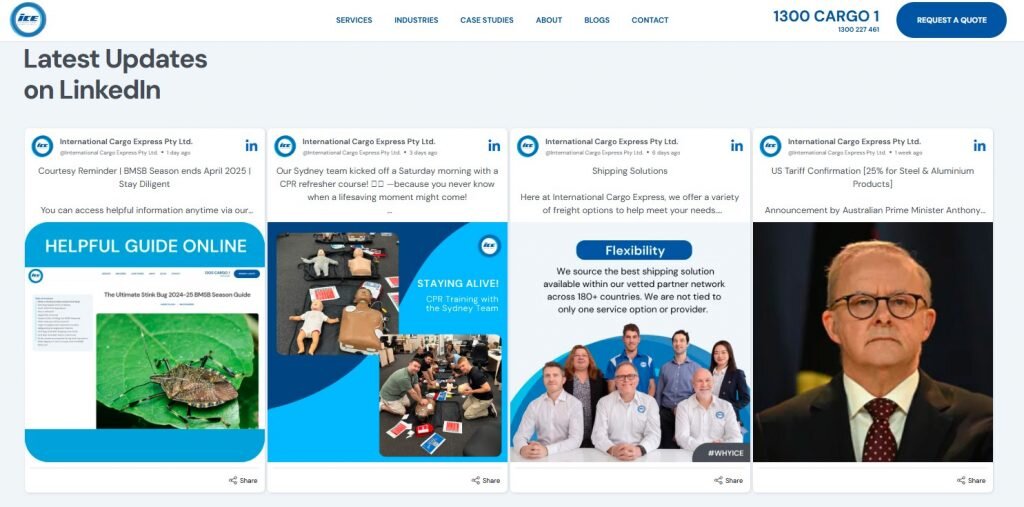
ICE is an Australian brand that focuses on international freight services across the globe. They keep their visitors updated about their brand’s latest announcements and on-goings by embedding a LinkedIn Feed.
Best Feature: The LinkedIn widget with posts allows the viewer to share the post on other platforms, such as X, Facebook, email, etc. The feed mainly focuses on the images, as the viewer has to click on the post to see the full text.
Unlock Business Success in 2025: Key Benefits of LinkedIn Feed Integration
LinkedIn is one of the World’s premium business networking sites. Considering that bringing LinkedIn to your website opens the door for many opportunities out there.
a). Boosts Professional Credibility + Brand Trust
Opting to LinkedIn embed company feed on website is a great way to showcase professional interaction. It also helps users appear professional to visitors in the long run. A LinkedIn widget on the website helps boost credibility, as the visitor sees the industry updates in real time.
b). Increases Networking Opportunities + Collaborations
Embedding a LinkedIn profile feed on the website helps users invite more connections with the organization. This facilitates more communication, allowing the visitors to connect and engage with the users immediately.
c). Content Diversity + Value
LinkedIn is a platform known for its professional content, including industry news, insights, articles, and updates. By embedding the LinkedIn feed on your website, you can enrich it with diverse and up-to-date content, providing value to visitors and encouraging them to spend more time on your site.
d). Social Proof + Credibility
Showcasing a LinkedIn post on the website is brilliant for businesses looking to enhance their social proof. Using LinkedIn, companies can showcase content related to other clients and ongoing projects. As a result, a LinkedIn video widget on a website would help the prospects trust the business and take it a step further.
e). SEO Benefits + Improved Ranking
A LinkedIn feed on the website acts like an engaging element on the webpage where visitors interact. As a result, it contributes to overall traffic and engagement. This boosts the website’s SEO benefits.
f). Enhances Brand Awareness + Consistency
Regularly showcasing professional achievements and industry insights reinforces your brand identity and values, keeping your brand top-of-mind for visitors. A LinkedIn widget is a great way to achieve this brand awareness.
Strategic Insights: LinkedIn Statistics For Business Growth in 2025
Let’s examine the statistics related to LinkedIn that can highlight its importance for your Business in 2025.
- 59% of brands are seen as “higher quality” after advertising on LinkedIn. According to LinkedIn, most people see a brand as premium if they advertise themselves on it. This means that being on LinkedIn is seen as a superior platform, which points out that if you include LinkedIn in your marketing, your business will be credible in the eyes of your target audience.
- 82% of B2B marketers see success on LinkedIn. Compared with other social media or networking platforms, LinkedIn has proved successful for B2B marketers. So, if you are a B2B marketer, LinkedIn is an unskippable part of your business.
- LinkedIn posts with images receive 98% more comments than those without them. Considering the given statistics, users can expect more traction when bringing LinkedIn to their website.
Wrapping Up!
Embedding LinkedIn videos and posts on your website is an innovative and decisive move to enhance your business presence online. This strategy can elevate the web presence of any brand. When a brand chooses to showcase LinkedIn, it seems professional to prospects.
And that’s not just it; showcasing a LinkedIn feed on a website opens doors for many opportunities for a business.
We have mentioned how to embed a LinkedIn company feed on a website. Try them and see your business grow.
FAQs
You can use tools like Tagbox to LinkedIn embed Company feed on website. It allows you to customize the feed as per our brand theme and hence make it more attractive for visitors.
You can link your LinkedIn profile feed on your website. You can also embed multiple LinkedIn posts on your website. However, LinkedIn has not yet given an option to embed the entire profile of a user.
It is very easy to add a LinkedIn feed to your website. All you have to do is follow the simple steps below.
- 1. Go to the LinkedIn post you want to embed.
- 2. From the top right corner of the post, click the “More” icon
- 3. Click on “Embed this post”.
- 4. Copy the LinkedIn embed code from the pop-up window that appears.
- 5. Paste the code where you want to display the LinkedIn feed on the website.
Yes, it is very easy to embed LinkedIn video on a website. You can do it using LinkedIn itself or other tools like Tagbox, Tagembed, etc.
Embed social feed from Facebook, YouTube, Instagram, Twitter on your website, like a PRO

